Global settings
Changing policies and other settings that apply to the whole organisation.
- How to download an organisation audit report
- How to configure the number of hits found in Pascal
- How to configure which cases can be read, and which can be edited
- How to change your media filters
- How to set up Microsoft Azure integration
- How to enforce two factor authentication
- How to add your own data to Pascal
- How to change the default monitoring frequency
How to download an organisation audit report
This documentation, including images, videos and text, is accurate as of Version 5.12 of Pascal.
We strive to keep our documentation up to date with each release to ensure it remains a reliable resource for our users. However, given the dynamic nature of our software development, there might be instances where changes introduced in subsequent versions are not immediately reflected in this documentation. We encourage users to refer to the latest release notes and to use the feedback mechanism for any discrepancies or requests for clarification.
Actions performed that effect the whole organisation, are tracked in the organisation audit. A report can be generated for a given time period to view all changes made to your Pascal environment.
Downloading an organisation audit report can only be done by users with an admin or owner role.
To download a report:
- Click on your initials in the top right corner.
- Select Settings besides your Pascal environment's name.
- Navigate to the Profile page in the Organisation section.
- In the Details card, click on the Download report button.
- In the new dialog that opened, choose the time period you would like to download the organisation report for.
- In the Choose content to include in the report select the information you would like to include in the report.
- Overview – Information about the organisation the report is generated for. Including the organisation’s name, address, country, phone number and technical contact.
- Audit – The audit of the chosen time period. With the action performed, when the action was performed and who performed the action.
- The filename can be changed if preferred.
- Download or email the report by selecting the Download or Email button.
How to configure the number of hits found in Pascal
This documentation, including images, videos and text, is accurate as of Version 6.4 of Pascal.
We strive to keep our documentation up to date with each release to ensure it remains a reliable resource for our users. However, given the dynamic nature of our software development, there might be instances where changes introduced in subsequent versions are not immediately reflected in this documentation. We encourage users to refer to the latest release notes and to use the feedback mechanism for any discrepancies or requests for clarification.
The number of hits that are returned by Pascal is based on the risk and confidence of that hit. The confidence thresholds in Pascal give you flexibility in your workload per case, by only showing hits that have a confidence above the given threshold. These settings can only be adjusted by owners and admins.
The confidence threshold will adjust the number of hits that Pascal returns per case. It is advised to discuss what settings will be working for your organisation and risk settings.
Changing the confidence threshold can be set per source. When a hit is below the given confidence threshold Pascal will filter it out of your case and the hit will not have to be resolved.
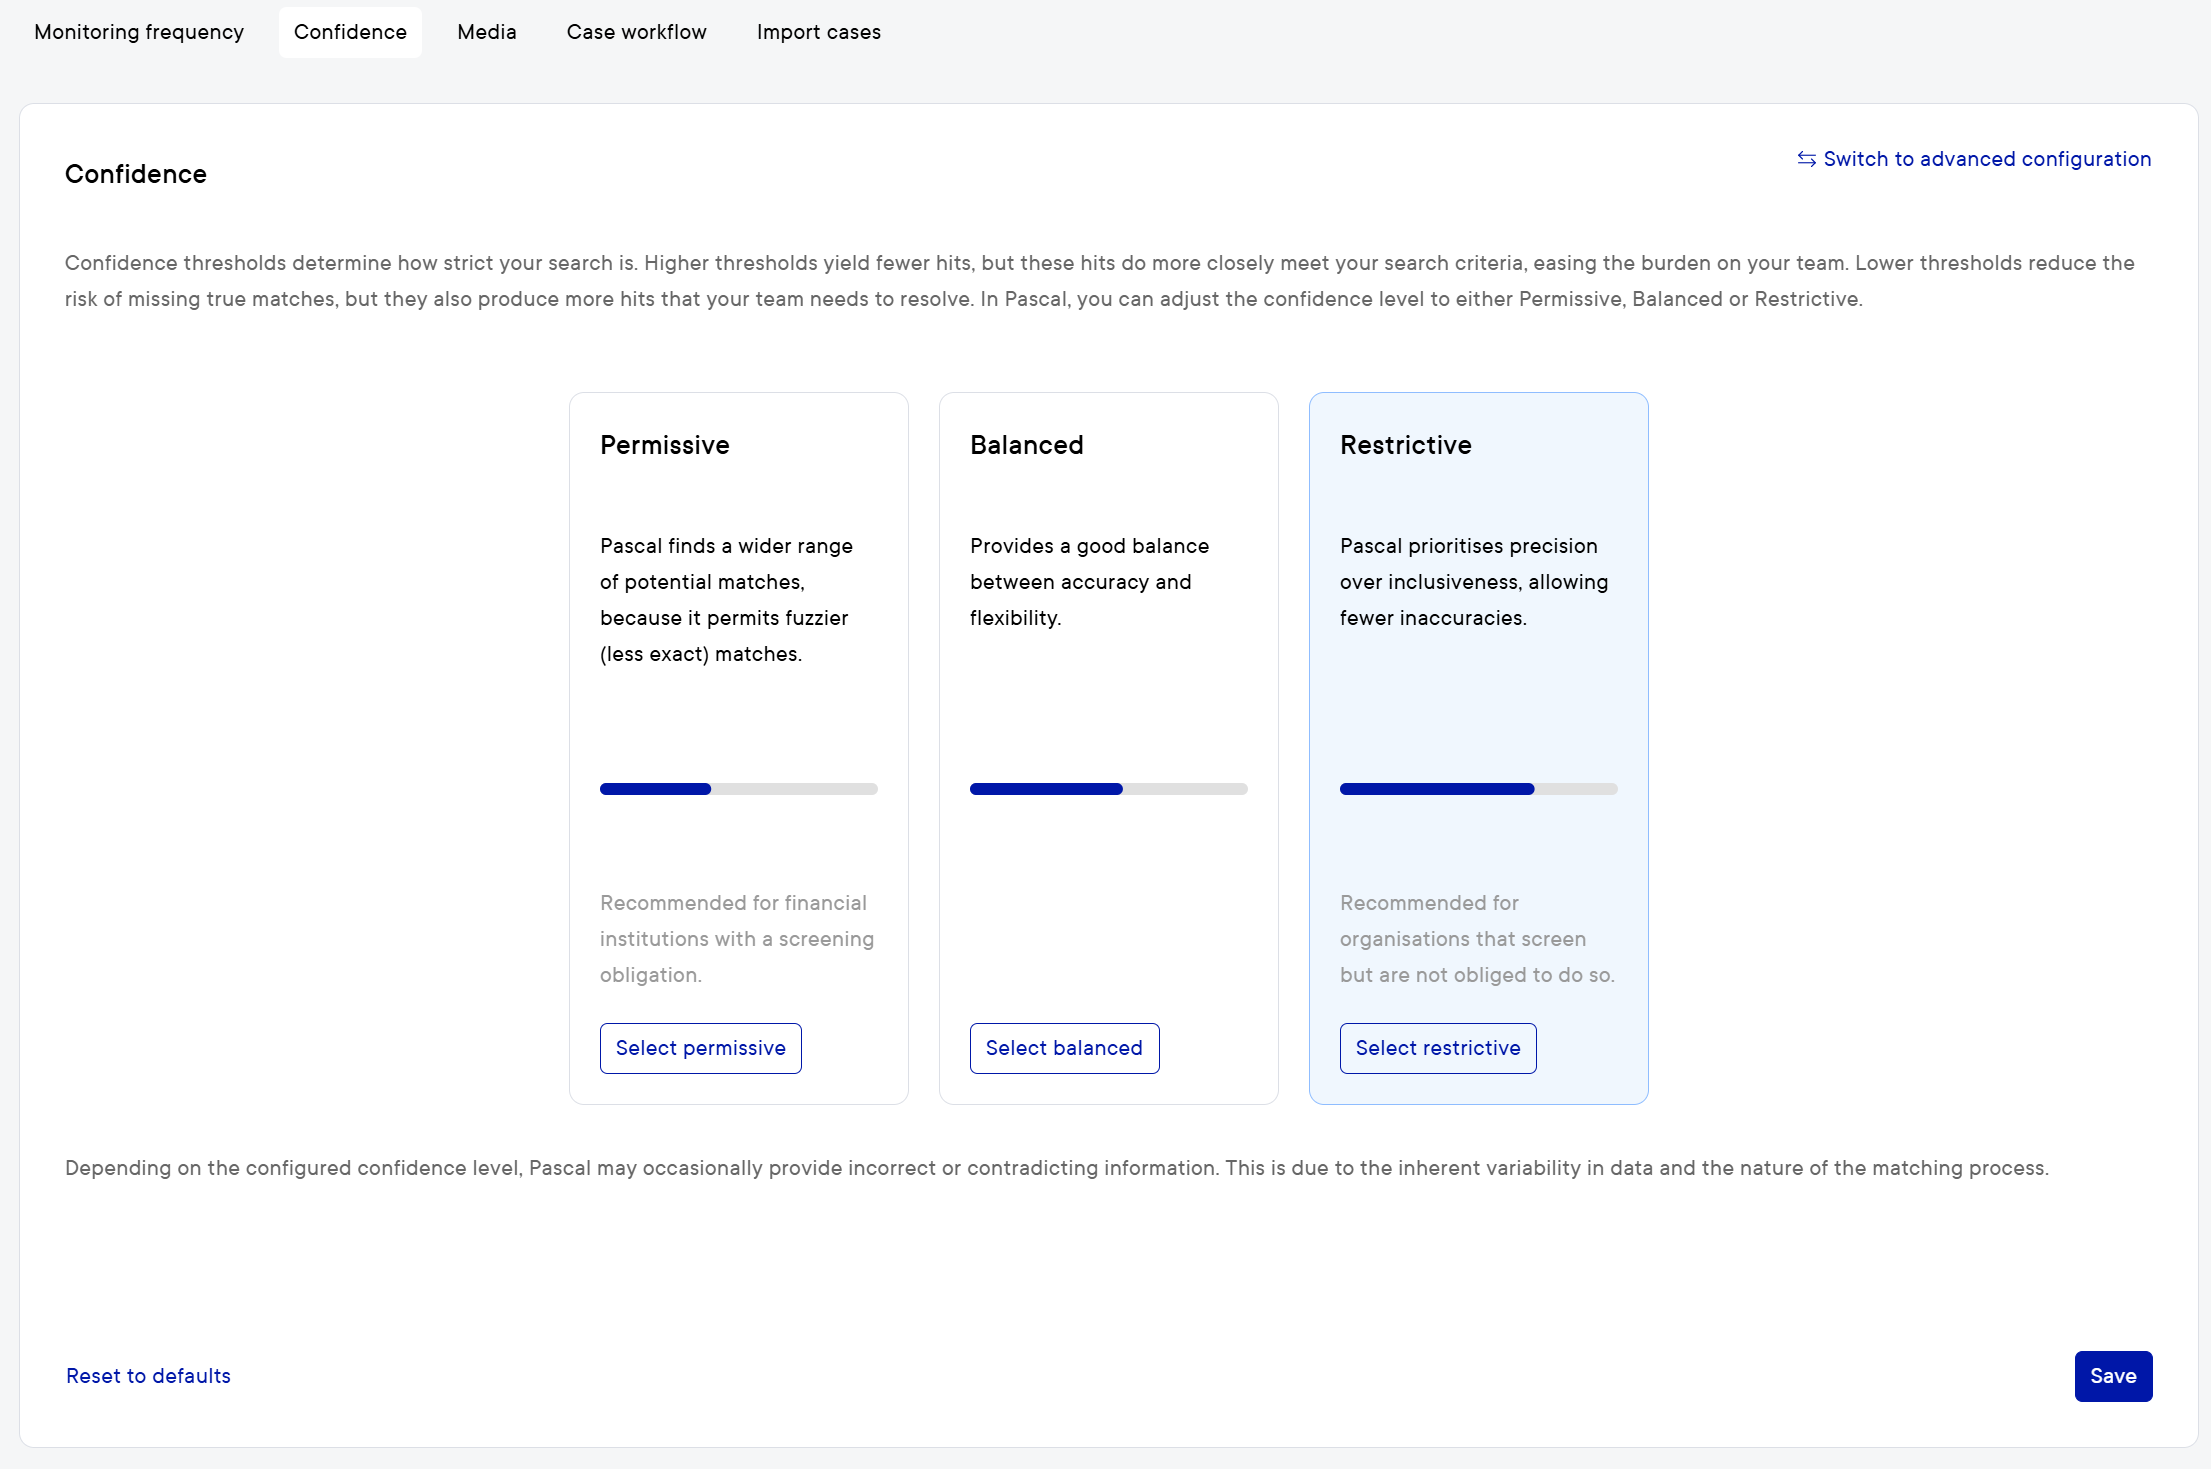
After pressing the save button multiple options are given regarding your already existing cases. When your threshold is changed it will immediately have effect on all new cases that will be made in the future. For already existing cases different options will be given to suit your organisation's wishes.
Delete unresolved hits that would no longer be found under the new policies
All cases that still have hits unresolved that now fall under the new confidence threshold will be removed. Hits that are above the confidence threshold will still be kept. Hits that are already resolved will never be removed.
After these hits are removed they cannot be found ever again in that case, also not through monitoring.
Delete all unresolved hits and perform new full searches
This option will refresh the unresolved hits in the case and will search through all sources again. The full search is triggered during the next monitoring session. When opening a case which needs to be searched, it will directly search again.
Do nothing
Nothing happens to your organisation's old cases and only new cases will be impacted by the confidence change.
How to configure which cases can be read, and which can be edited
This documentation, including images, videos and text, is accurate as of Version 5.12 of Pascal.
We strive to keep our documentation up to date with each release to ensure it remains a reliable resource for our users. However, given the dynamic nature of our software development, there might be instances where changes introduced in subsequent versions are not immediately reflected in this documentation. We encourage users to refer to the latest release notes and to use the feedback mechanism for any discrepancies or requests for clarification.
Organisation owners and admins can adjust the read and edit rights of cases. This feature allows sensitive information to be concealed from users who should not have access. Moreover, it allows users to focus only on cases that are relevant to them. The chosen read and edit rights apply to all users within the organisation.
Possible configuration options
You can choose between multiple options which influence the edit and read rights of all users inside your organisation. Below all options are summarised.
- Organisation - A user can read or edit all cases in the organisation.
- Group - A user can read or edit cases within their group and their own cases. But not cases that are outside their group.
- Personal - A user can read or edit only their own cases.
Choosing Personal read or edit right limits everyone in your organisation from editing or reading a case, including editing the assignee. Only the assigned user can change the assignee, which can disrupt certain workflows when users are on leave.
Where to change the rights?
- Click on your intials in the top right corner.
- Select Settings besides your Pascal environment's name.
- Navigate to the Profile page in the Organisation section.
- In the Security card, change the edit or read rights by clicking the field Edit rights or Read rights .
- Select your preferred option and press Save.
The available options for edit rights are depended on your read rights. If any of your preferred options are not visible please make sure that the read rights are correctly configured.
How to change your media filters
This documentation, including images, videos and text, is accurate as of Version 6.4 of Pascal.
We strive to keep our documentation up to date with each release to ensure it remains a reliable resource for our users. However, given the dynamic nature of our software development, there might be instances where changes introduced in subsequent versions are not immediately reflected in this documentation. We encourage users to refer to the latest release notes and to use the feedback mechanism for any discrepancies or requests for clarification.
Some media filters can be set in the Media page in the Screening Settings of Pascal. You can find these settings by following the below steps:
- Click on your initials in the top right corner.
- Select Settings besides your Pascal environment's name.
- Navigate to the Media page in the Screening section.
- Press the Save button after your changes.
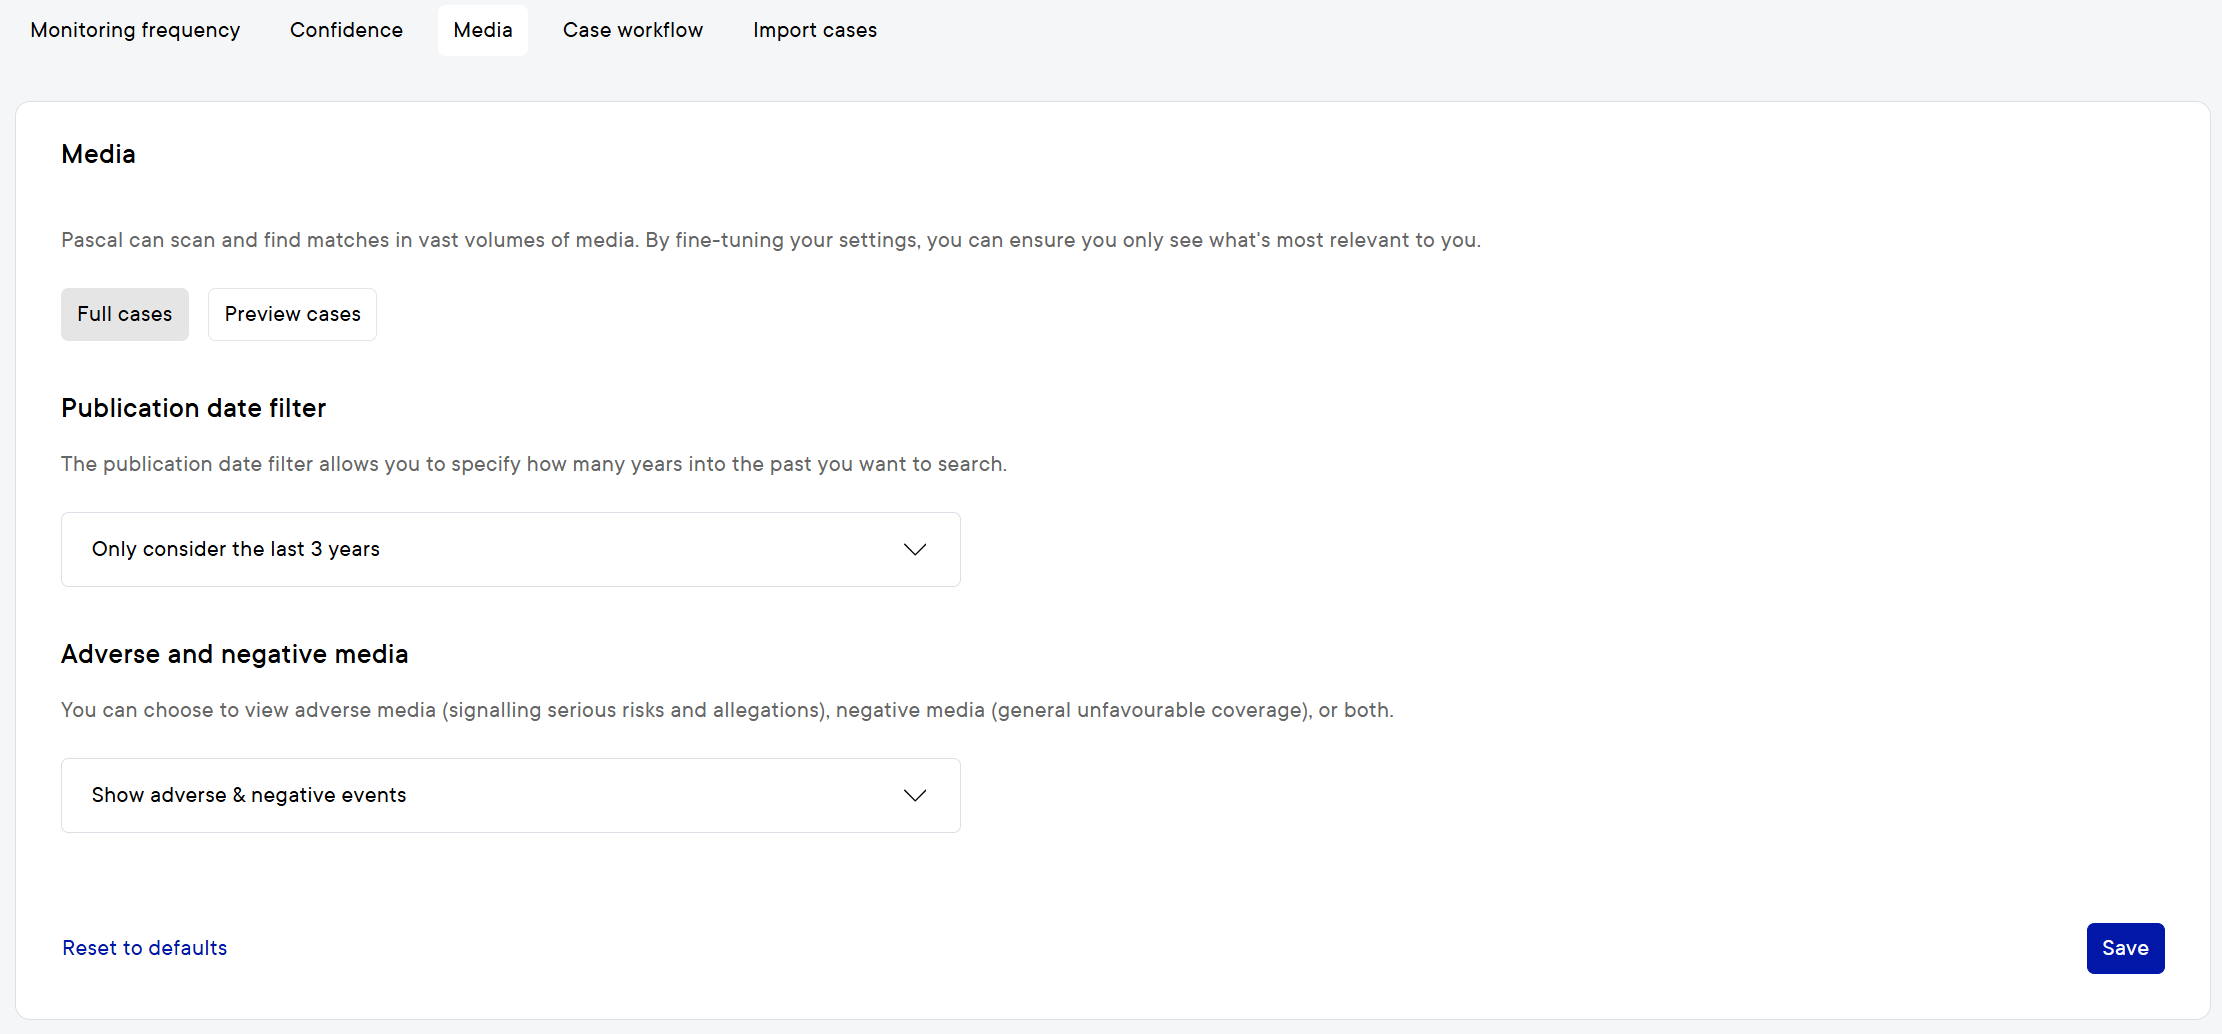
Here, several settings can be altered to your desire:
- Media age filter - can be changed to show search all articles in the Media source. Or there are options to only search media articles published in the last year, last 2 years, last 3 years, last 4 years, up to the last 10 years.
- Show only adverse events - When choosing for this option, only media in our 11 supported languages (English, Spanish, German, Italian, French, Russian, Turkish, Portuguese, Arabic, Romanian and Dutch) with an attached adverse event will be searched on.
- Show only negative events - When choosing for this option, only media in our 11 supported languages (English, Spanish, German, Italian, French, Russian, Turkish, Portuguese, Arabic, Romanian and Dutch) with one or more attached negative events will be searched on.
- Show adverse & negative events - When choosing for this option, only media in our 11 supported languages (English, Spanish, German, Italian, French, Russian, Turkish, Portuguese, Arabic, Romanian and Dutch) with one or more attached negative events and/or adverse events will be searched on.
How to set up Microsoft Azure integration
This documentation, including images, videos and text, is accurate as of Version 5.12 of Pascal.
We strive to keep our documentation up to date with each release to ensure it remains a reliable resource for our users. However, given the dynamic nature of our software development, there might be instances where changes introduced in subsequent versions are not immediately reflected in this documentation. We encourage users to refer to the latest release notes and to use the feedback mechanism for any discrepancies or requests for clarification.
Microsoft Azure integration can greatly speed up the onboarding process of new users in your Pascal organisation. This feature enables the possibility to use the single sign-on button on the login page.
Setting up Microsoft Azure
In your company's Azure environment several settings need to be configured before Microsoft Azure can be configured in Pascal.
- Within your own Azure environment navigate to User settings.
- In the section enterprise application settings, a toggle can be found. Either one of two options need to be turned on: Users can consent to apps accessing company data on their behalf or Users can request admin consent to apps they are unable to consent to.
Adding a Tenant ID to Pascal
Furthermore, a Tenant ID needs to be added to your Pascal organisation. Only admins and owners can access submit a Tenant ID. To add your Tenant ID to Pascal, follow the following steps.
- Click on your initials in the top right corner.
- Select Settings besides your Pascal environment's name.
- Navigate to the Integrations page in the Organisation section.
- Insert the Tenant ID in the field Tenant ID or press Sign in with your Microsoft account to fill this field in automatically.
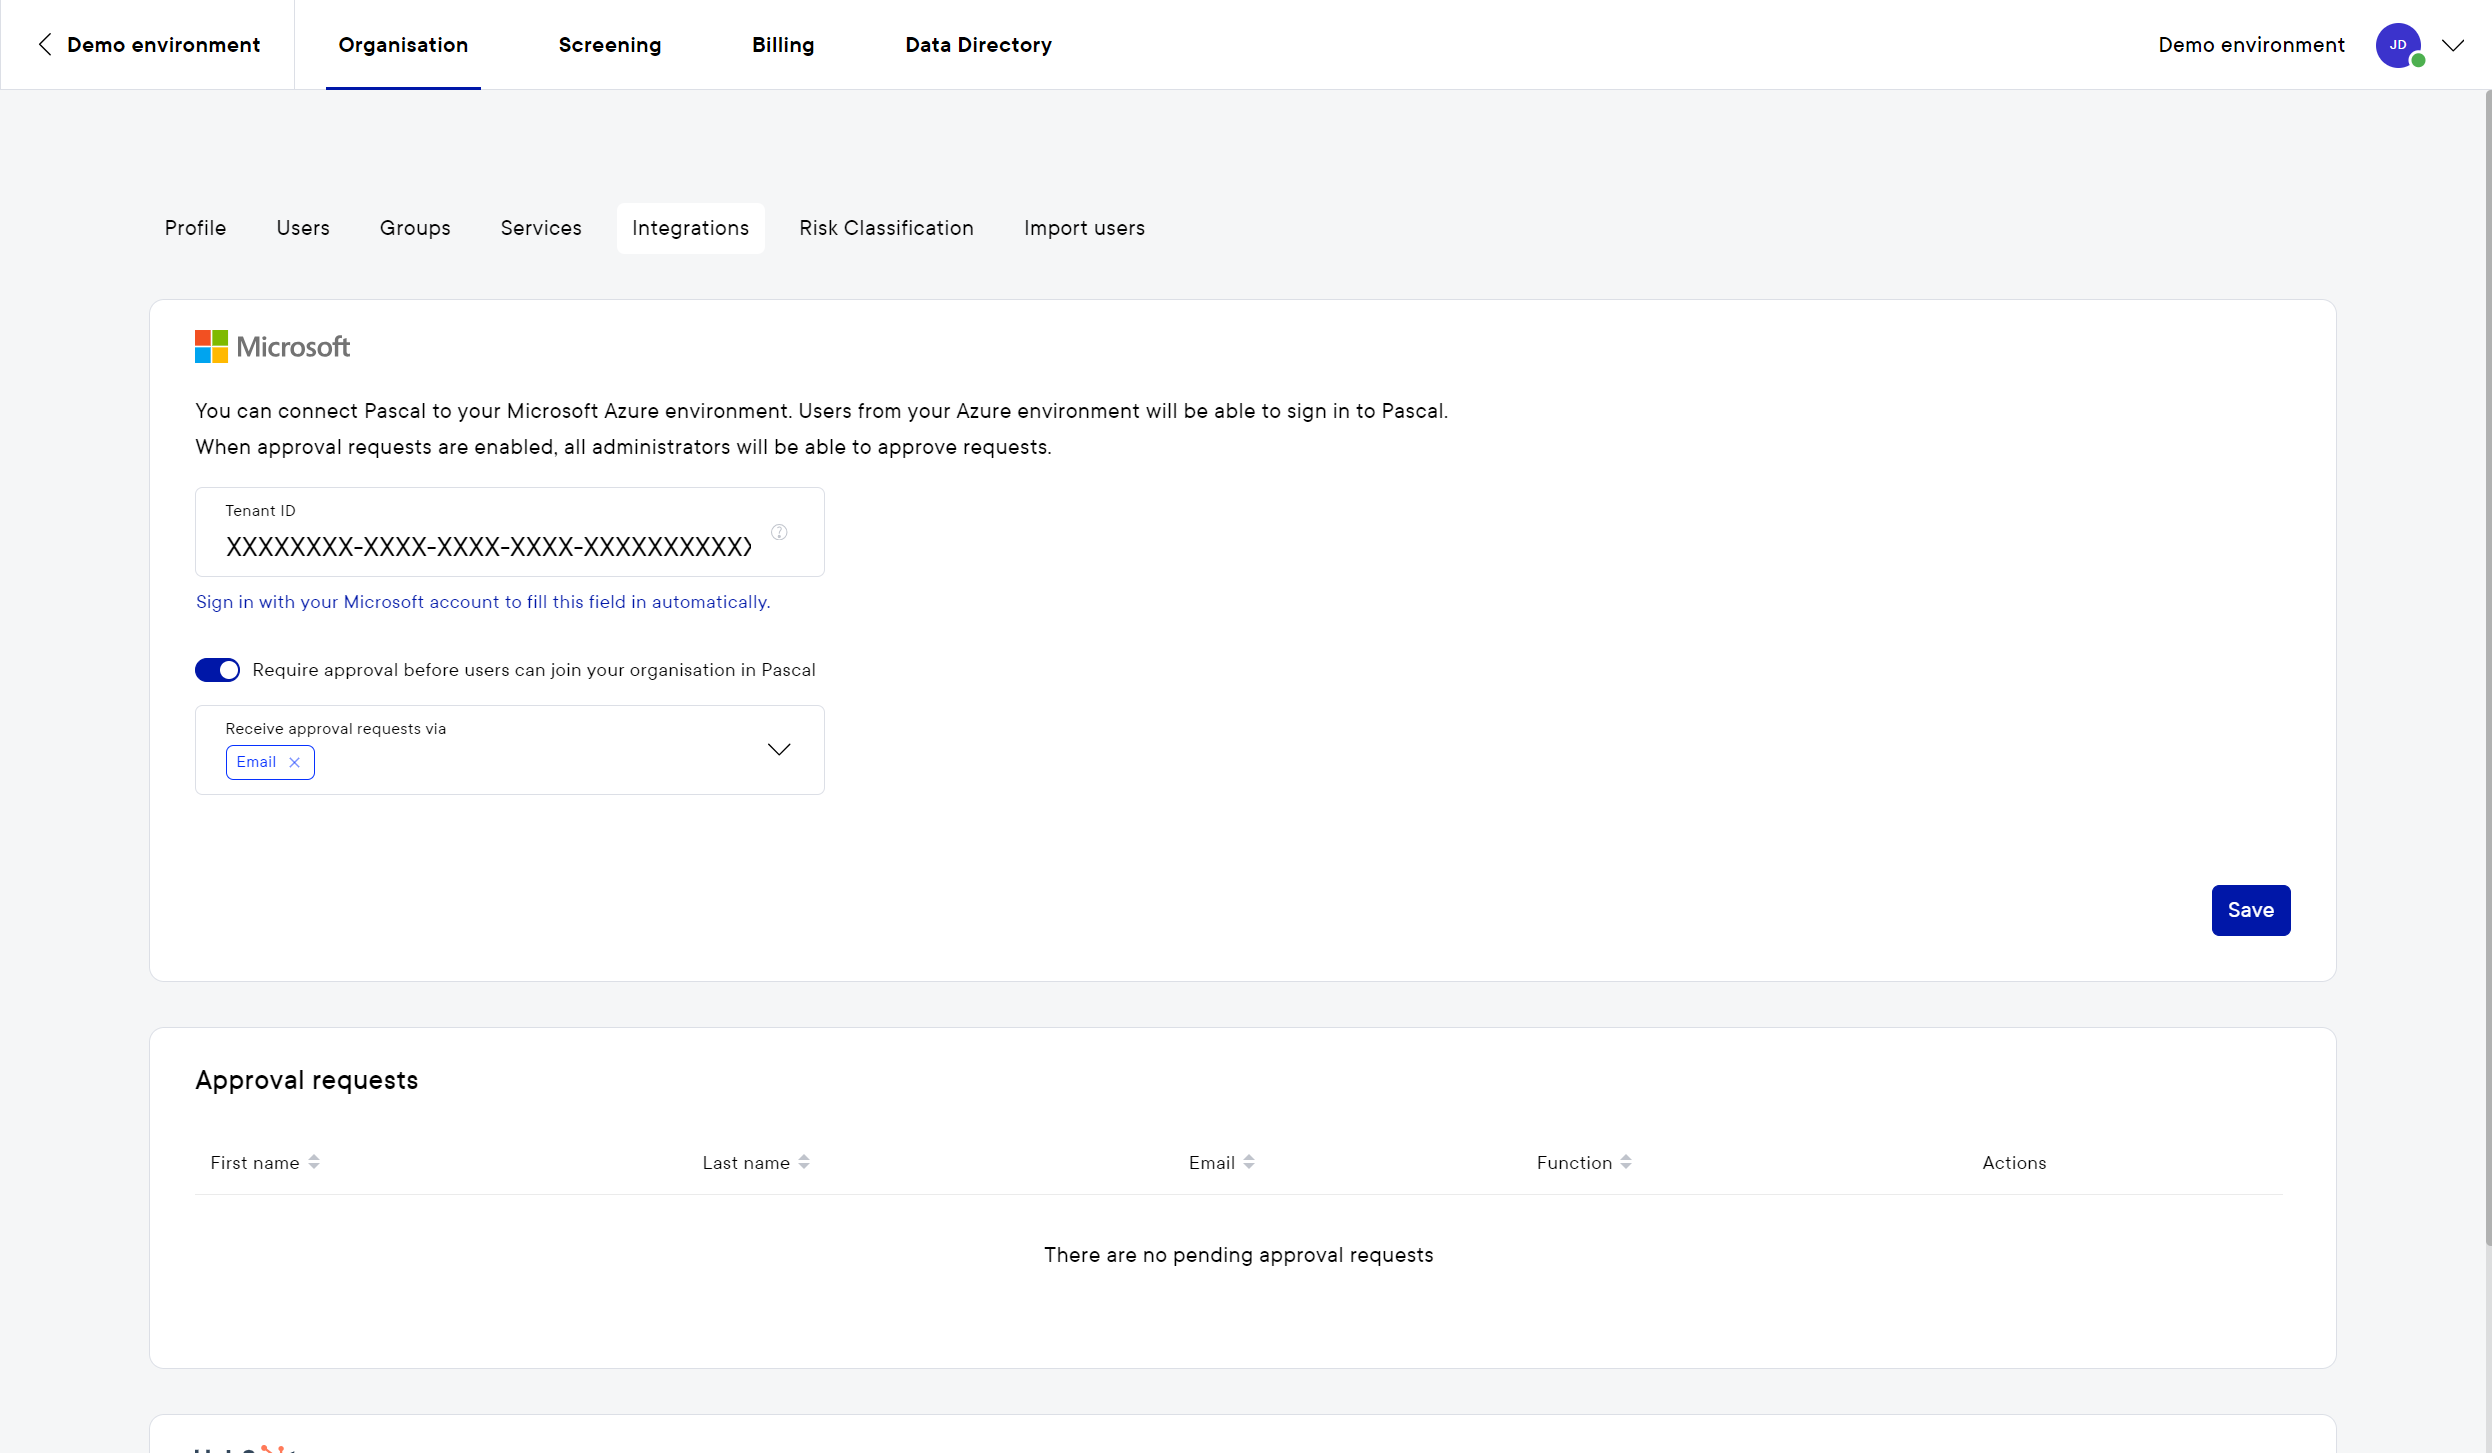
Approval workflow for new users
It is possible to first review which employees would like access to Pascal. Within the Integrations turn on the feature Require approval before users can join your organisation in Pascal. Users who sign in with Microsoft Azure will now first need to be approved before their account is active. An email is sent out to all admins and owners stating an approval needs to be given.
Approving users
- Click on your initials in the top right corner.
- Select Settings besides your Pascal environment's name.
- Navigate to the Integrations page in the Organisation section.
- Under the section Approval requests each user that requested access is shown. A user can be accepted by pressing the check button or rejected by pressing the cross button.
How to enforce two factor authentication
This documentation, including images, videos and text, is accurate as of Version 5.12 of Pascal.
We strive to keep our documentation up to date with each release to ensure it remains a reliable resource for our users. However, given the dynamic nature of our software development, there might be instances where changes introduced in subsequent versions are not immediately reflected in this documentation. We encourage users to refer to the latest release notes and to use the feedback mechanism for any discrepancies or requests for clarification.
Two factor authentication improves the security of accounts, preventing access when a password was leaked. It is advised to use this setting to protect sensitive data in your organisation. Only owners and admins can change this setting.
Enable two factor authentication
- Click on your initials in the top right corner.
- Select Settings besides your Pascal environment's name.
- Navigate to the Profile page in the Organisation section.
- Scroll down to the Security section in the Profile page.
- Toggle the Require multi-factor authentication via email button and press Save.
When the setting has been turned on all users will receive a verification code in their email which is required to login to their Pascal account. The verification code to login will be required once a month for each unique IP address.
When using Microsoft Azure to login to Pascal, the two-factor authentication will not be required on login.
How to add your own data to Pascal
This documentation, including images, videos and text, is accurate as of Version 5.12 of Pascal.
We strive to keep our documentation up to date with each release to ensure it remains a reliable resource for our users. However, given the dynamic nature of our software development, there might be instances where changes introduced in subsequent versions are not immediately reflected in this documentation. We encourage users to refer to the latest release notes and to use the feedback mechanism for any discrepancies or requests for clarification.
Besides the provided datasets in Pascal, you can also add your own data. In circumstances where your organisation has their own dataset that is complementary to the Pascal datasets the option is available to add these to your searches. Only owners and admins can add these entities, but all users will be able to find them in their searches.
If this feature is not available for you, please check if it has been enabled in your services.
Four sources are supported for adding your own data: Sanctions, Enforcements, Politically Exposed Persons, Business: Companies, and Business: Officers. You can create an entity by following these steps:
Mandatory fields are marked with an asterisk.
An overview of all entities made per source can be found at the same page where you add an entry. All these cases can be found in new cases, but also through monitoring searches in already existing cases.
How to change the default monitoring frequency
This documentation, including images, videos and text, is accurate as of Version 6.6 of Pascal.
We strive to keep our documentation up to date with each release to ensure it remains a reliable resource for our users. However, given the dynamic nature of our software development, there might be instances where changes introduced in subsequent versions are not immediately reflected in this documentation. We encourage users to refer to the latest release notes and to use the feedback mechanism for any discrepancies or requests for clarification.
Monitored cases are searched periodically, The interval in which the sources of cases are searched, is defined in the Screening Settings of your environment. To navigate to these settings:
- Click on your initials in the top right corner.
- Select Settings next to your environment's name.
- Click on the Screening section in the top of the page.
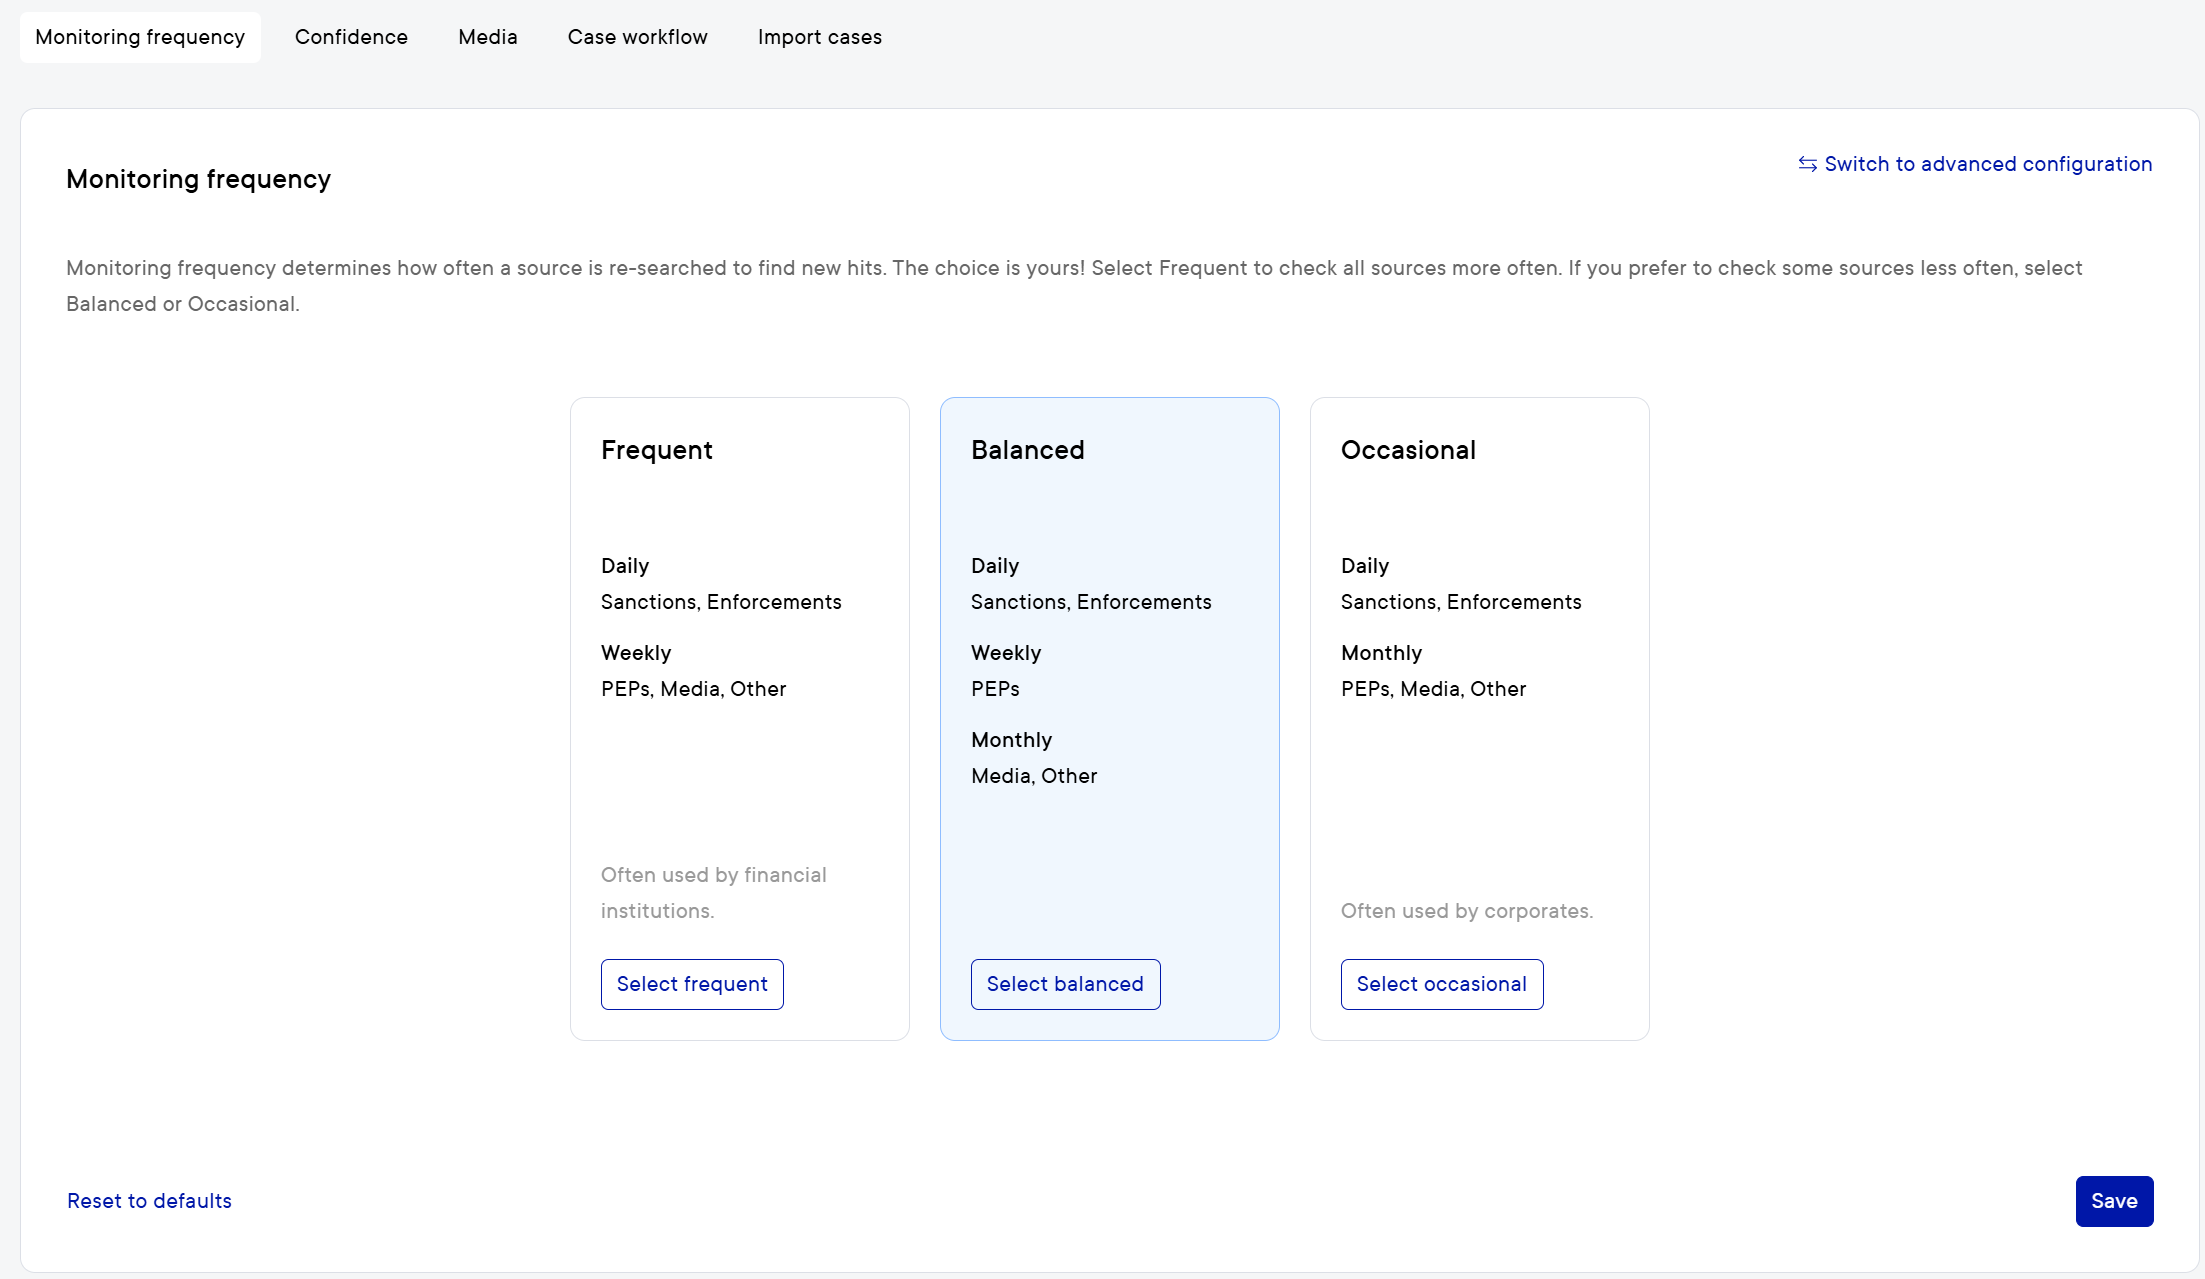
- Navigate to the Monitoring frequency tab.
Here, the monitoring frequency can be changed, either by selecting one our our recommended options or with a custom configuration. To view our recommended options, use the Switch to simplified configuration in the top right corner. To set up a custom configuration, use the Switch to advanced configuration in the top right corner. Here, for each source in Pascal a frequency can be selected from Daily (every day), Weekly (every 7 days), Monthly (every 28 days), Quarterly (every 90 days) and Yearly (every 365 days).
After made changes, press the Save button to apply your changes. You will be presented with a dialog asking if you'd like to apply the monitoring frequency to existing cases. With this option turned on, your made changes are applied to new and existing cases. If this option is turned off, your made changes are only applied to cases created after this change.
This setting, sets the default monitoring frequencies of all active sources in your environment. Within a single case, you can deviate from the default frequencies to set a custom frequency for a specific sources in that single case.