Main workflow Pascal Onboarding
This documentation, including images, videos and text, is accurate as of Version 5.15 of Pascal.
We strive to keep our documentation up to date with each release to ensure it remains a reliable resource for our users. However, given the dynamic nature of our software development, there might be instances where changes introduced in subsequent versions are not immediately reflected in this documentation. We encourage users to refer to the latest release notes and to use the feedback mechanism for any discrepancies or requests for clarification.
Pascal Onboarding assists in onboarding new clients in which collaboration takes place. Assisting in sending out customised questionnaires, performing screenings and verifications on individuals encountered during the onboarding process, and approving the onboarding process to finalise.
To create a client and initiate the onboarding process the following steps can be followed:
-
On the Home page of the Onboarding section of Pascal, press the New client button.
-
Click on the Client name field. Here, you can select an existing client name from Pascal Screening or insert a new client name.
-
Optionally, a description of the client can be provided in the Description text area.
-
Select a pre-created onboarding form template in the Onboarding form field.
-
Press the Next button.
-
On the next page, names and email addresses should be provided of externals who will be working with you on this onboarding, from the client’s side. They are the initial external team and will be assigned to fill in the form selected in the previous section.
-
Press the Next button.
-
Assign a user to be primarily responsible for the client’s onboarding project. Optionally, collaborators can be added to the onboarding process as well.
The client page shows all details about the onboarding process you just created. On the top section, the process of the onboarding is shown with the steps In progress, Ready for approval, Waiting for approval and Completed.
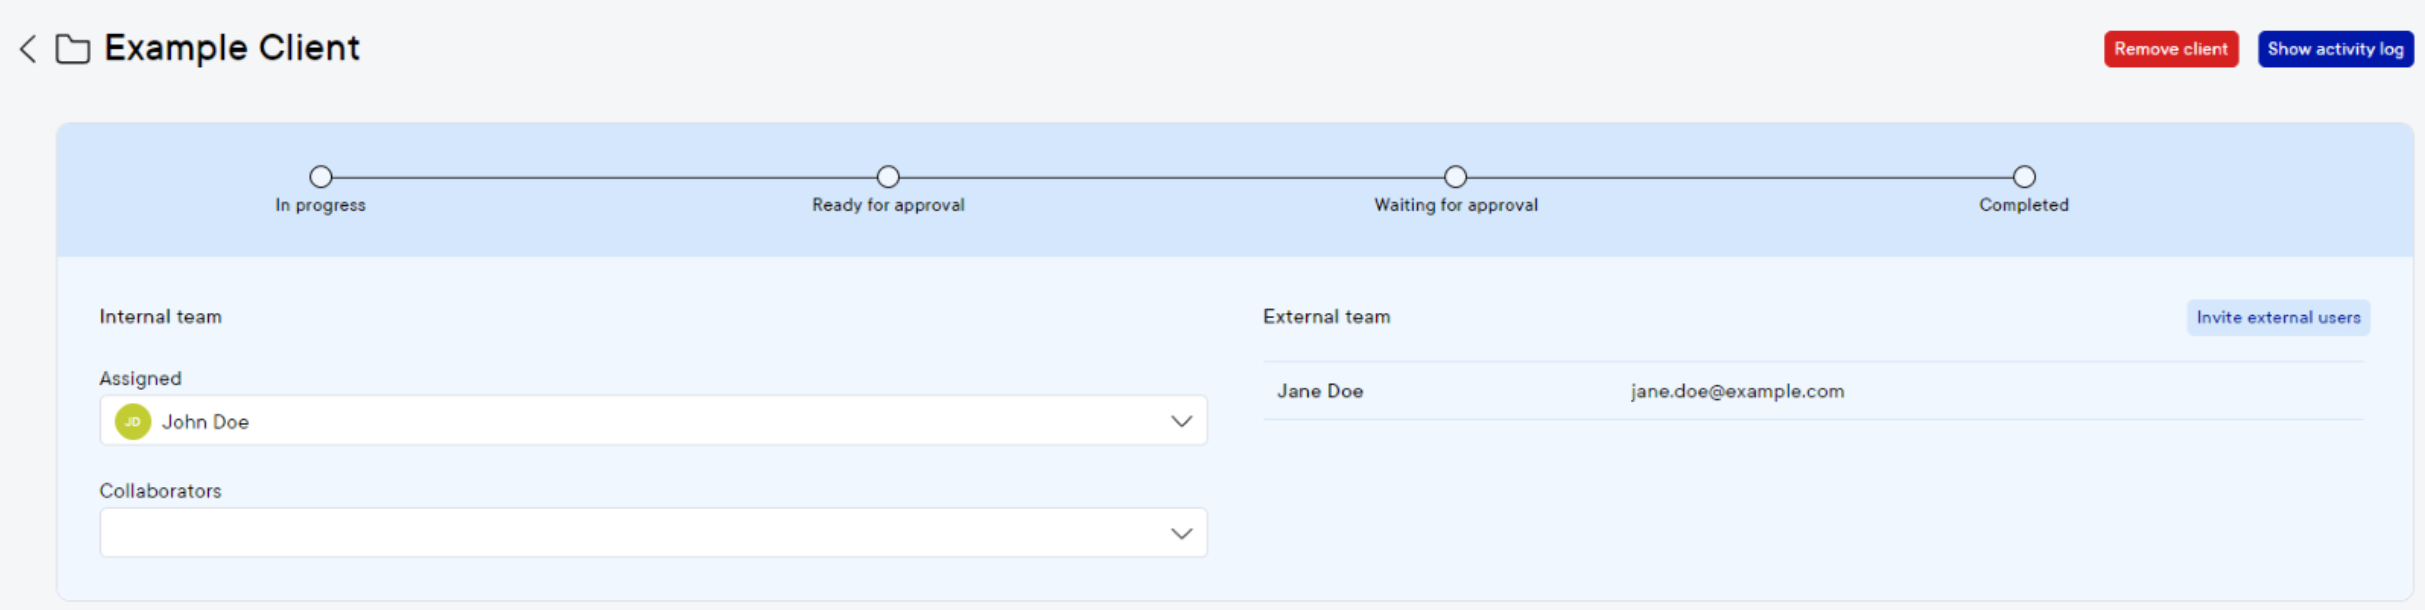
If the external team needs to be expanded, this can be done by selecting Invite external users on this section of the page.
The Forms card shows all the forms sent out to externals for this client. Here, you can also monitor the progress of the forms by those externals. The External assignee is the person from the client who is assigned to complete the send form.
An email will be sent to them with a link to access the form. After using this link, a verification code will be sent to their email address to fill in before the form can be accessed. After all required questions are answered, the button ‘Submit for approval’ should be used to finish the form.

After the form is finished and submitted, the client's assignee in Pascal Onboarding will receive an email to inform that the form was submitted by the externals. Now, the internal team can open the form to review the filled in information from the externals and optionally answer any internal questions in the form as well. After all internal questions are answered and the answers from the externals are reviewed, the form can be submitted for approval by pressing the Submit for approval button on the form page.
Entities provided in the form by the external can also be used to initiate an entity screening with. This can be done in the Entities section of the client, by pressing the Add in entity screening button. In this Add case section, all entity information can be provided whereafter a screening can be initiated with the button Create case. Entities’ identity can also be verified using the Veriff integration. To do this, the text Send invitation below Verification can be used.

Now, the internal approval can start. Which is based on the approval template created during the setup before. If multiple approval templates are available, you can change the approval template you’d like to use for this client in the top right corner of the Internal approval section of the client page. When the correct approval template is selected, the Start internal approval at the bottom of the client page, will initiate the approval workflow. Now, the function(s) mentioned in Step 1 will have to approve the onboarding of the client first. Then, users with the function(s) mentioned in Step 2 will have to review and approve or decline the onboarding and so on until all steps have been completed.

Now, the onboarding of the client is completed, which is reflected on the Clients’ page in the status column.