HubSpot setup guide
How to install the Pascal app in HubSpot
If you already have a Pascal environment, you need to make the HubSpot and Pascal connection from within the Integration settings in Pascal.
- Go to the App Marketplace in HubSpot.
- Search for Pascal in the search bar for apps.
- Click on the Pascal app in the search results.
- In the Pascal app marketplace page, click on the Install app button at the top right of the screen.
- If your HubSpot account is connected to multiple HubSpot environments, you will need to select the environment you would like to connect the Pascal app to.
- An overview is given of the app and the button Connect app at the bottom of the screen should be pressed to connect the app.
- Now, a window will open where you can create a Pascal environment
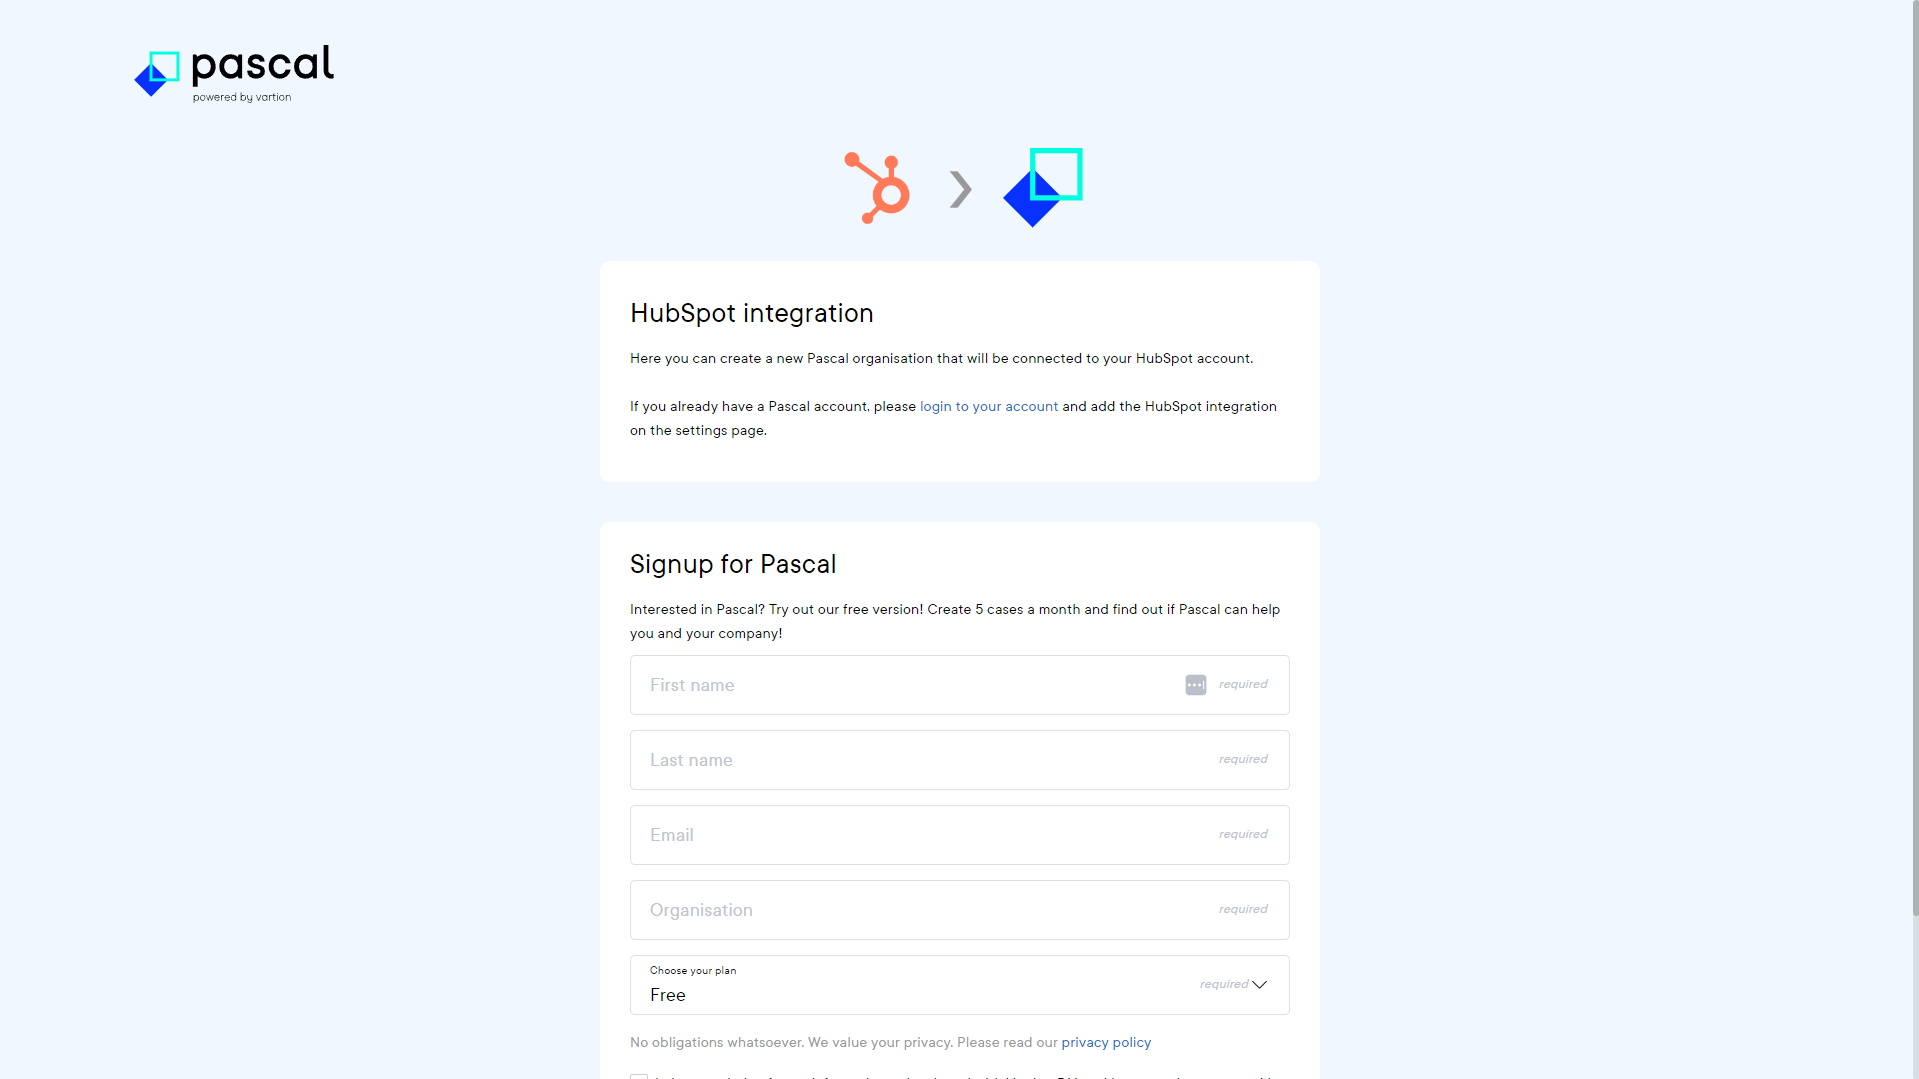
If you already have a Pascal account, you'll need to connect your HubSpot and Pascal environments from within the Integration settings in the Pascal application. - In this Signup form for Pascal, some information needs to be provided to create the Pascal environment to connect to HubSpot. A first name and last name need to be provided, the email address you would like to use with your account and the name of the Pascal environment you would like to use. There is also an option to choose for a free or paid organisation.
- Select the checkbox if you agree with the statement and click on the Create organisation button.
- Your Pascal environment is now created and linked to your HubSpot environment.
Add country property for contacts and companies
Result quality increases significantly when searching with a name and country. We highly recommend to add the country property for contacts and companies.
- Go to the Contacts page in HubSpot.
- Select the Create contact button.
- Click on Edit this form in the top right corner.
- Select Add properties in the left sidebar.
- Open the section Contact information.
- Select the checkbox Country/Region.
- The new field shows up in the preview of the contact form on the right. To reorder the fields drag the Country/Region field up, and let go just below Last name. This is useful as you can then quickly fill in the contact's first name, last name and country when adding a contact to your HubSpot environment.
- Optionally, you can make the field Country/Region required, so no one in your environment can forget to fill in this field. You can do this by selecting the * button while hovering over the field.
- Click on the Save button in the top right corner.
These steps can also be followed to add the country property to companies.
Enable notes for all users
When KYC checks are performed in HubSpot contacts or companies, notes of the results and a report about the check is added. It is useful to make sure that all users in HubSpot can see these results and the attached report.
Add or change the permission for users to view all notes in the HubSpot environment. If you are not sure how to do this, use the HubSpot documentation to achieve this.
If notes are not enabled for all users, users cannot see KYC check information in the notes from each other.
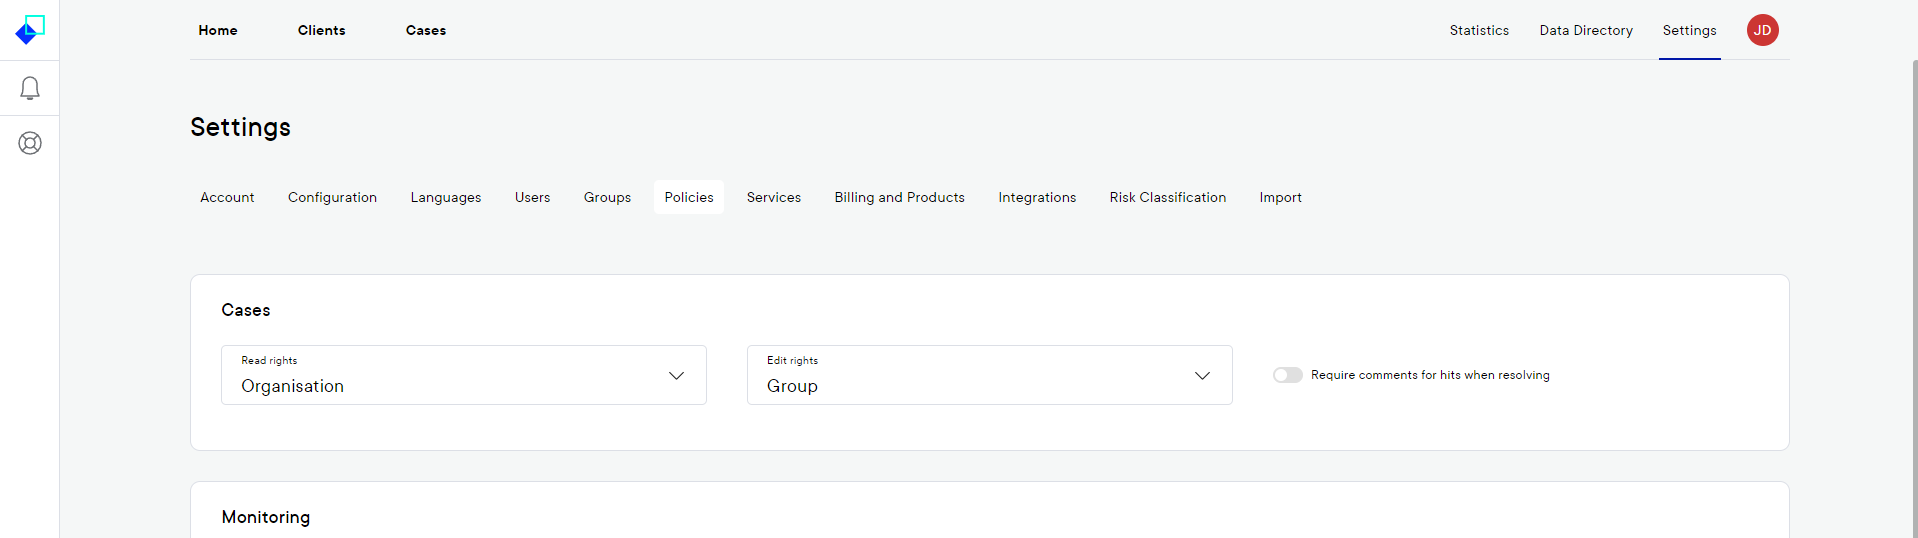
View policy in Pascal
To make sure all users in HubSpot can see each other KYC checks and no duplicate checks are created, the view policy in Pascal should be changes so everyone can see all checks in the whole Pascal environment. To do this, follow the below steps:
- Go to the Pascal website by going to https://app.pascal.vartion.com/.
- Login to the application and click on Settings in the top right corner.
- Click on the Policies tab in the top of the screen.
- In the Cases card, make sure the Read rights is set to Organisation.
- If this isn't the case, change the Read rights to Organisation, scroll down to the bottom of the screen and select the Save button at the bottom.
Add KYC check properties to contact and company information
When you add the Pascal application to your HubSpot account, a KYC Risk property is added to your system. This property indicates the risk found in the KYC checks done on your contacts and companies. This property can be added in general overviews and can also be overwritten by you if you do not agree with the risk given to the entity by Pascal.
In below steps will be explained how you can add this property to the lists overviews of contacts and companies and how to add the property to a contact's page and company's page.
In the list overview of all your contacts you can add the column KYC Risk. To add this column, follow the below steps:
- Click on the Contacts dropdown in the top left of the HubSpot window and click on Contacts.
- Inside the table in the top right corner, select the Actions button.
- Then choose for the Edit columns option.
- Here, numerous properties can be added to the contacts table overview. Search for KYC Risk.
- Check the checkbox to include the KYC Risk property in your table overview.
- If you prefer, you can alter the order of the columns on the right side of the window by dragging a property up or down.
- Click on the Apply button when you are finished.
You can add the KYC Risk property also to the company's overview. To add this column in the company's overview, follow the below steps:
- Click on the Contacts dropdown in the top left of the HubSpot window and click on Companies.
- Inside the table in the top right corner, select the Actions button.
- Then choose for the Edit columns option.
- Here, numerous properties can be added to the contacts table overview. Search for KYC Risk.
- Check the checkbox to include the KYC Risk property in your table overview.
- If you prefer, you can alter the order of the columns on the right side of the window by dragging a property up or down.
- Click on the Apply button when you are finished.
Another option is to add the KYC Risk property to the contact details page in the About this contact section. To do this, follow the below steps:
- Click on the Contacts dropdown in the top left of the HubSpot window and click on Contacts.
- Inside the table, click on a contact to navigate to that contact's page.
- On the contact's page, on the left side, scroll down to the bottom of the About this contact section. Click on the View all properties button.
- Search in the search bar for KYC Risk. While hovering over the given result, select the Add to your view button on the right side. Now, the KYC Risk can be viewed in the contact's page.
The KYC Risk property can also be added to a company's page. To do this, follow the below steps:
- Click on the Contacts dropdown in the top left of the HubSpot window and click on Companies.
- Inside the table, click on a company to navigate to that company's page.
- On the company's page, on the left side, scroll down to the bottom of the About this company section. Click on the View all properties button.
- Search in the search bar for KYC Risk. While hovering over the given result, select the Add to your view button on the right side. Now, the KYC Risk can be viewed in the company's page.