How to create a KYC check from within HubSpot
This documentation, including images, videos and text, is accurate as of Version 5.10 of Pascal.
We strive to keep our documentation up to date with each release to ensure it remains a reliable resource for our users. However, given the dynamic nature of our software development, there might be instances where changes introduced in subsequent versions are not immediately reflected in this documentation. We encourage users to refer to the latest release notes and to use the feedback mechanism for any discrepancies or requests for clarification.
With the Pascal app connected to your HubSpot environment, KYC checks can be initiated easily and even automated from within your HubSpot environment.
Automatic KYC checks
KYC checks can automatically be performed when a new contact or company is added to your HubSpot environment.
This setting is turned on by default, and can be turned on or off with the following steps:
- With the correct permissions in HubSpot, navigate to the settings in HubSpot by selecting the settings wheel icon in the top right corner.
- In the left navigation menu select under Integrations the page Connected Apps.
- Here, the Pascal app will be displayed between potential other apps. Press the Actions button in the Pascal app card and click on the Go to settings button there.
- The settings of the Pascal app will show up. Here, the setting Automatic KYC Checks is present. Click on the toggle on the right side to turn this functionality on or off. When the toggle is green with a checkmark in it, automatic KYC checks is turned on.

When this setting is turned off, new contacts and companies added to HubSpot will not automatically get KYC checks. However, these KYC checks can still be initiated manually from within the contact or company from within HubSpot.
How to perform a manual KYC check on a contact or company
A KYC check can be initiated manually if desired in a contact or company from within HubSpot.
This can be done by:
- Navigate to the HubSpot contact you would like to create a KYC check for.
- In the side bar on the right, the section KYC Check is visible due to the Pascal app installed in your HubSpot environment.
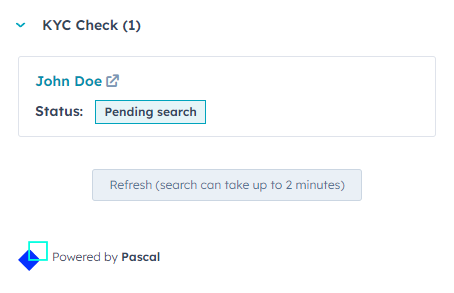
- In the KYC Check section, press the Create case button.
- The message Create case succeeded will show up at the top of the page. Additionally, the KYC Check card will now display the created case.
- However, the case is still searching for potential results. To see if the search is done, the button Refresh (search can take up to 2 minutes) can be pressed.
- After the case is done searching and the refresh button is pressed after the search was completed the status, results and risk will be visualised from the case. A note is also added to the contact or company about the found results.
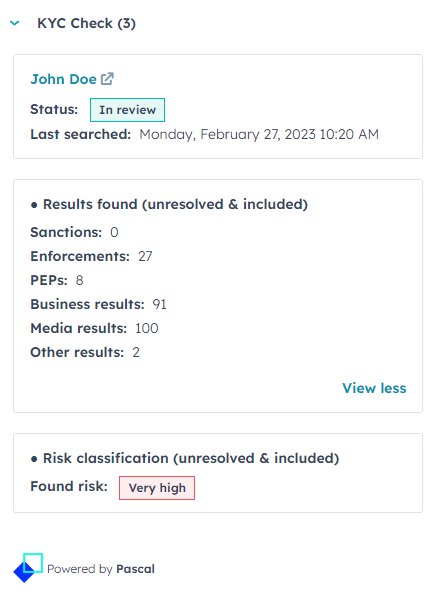
If you would like to view the found results and verify the found hits, you can click on the contact or company's name in the KYC check card, this will open Pascal in a new page. If you are not already logged in to Pascal, you will see the login page of Pascal. After logging in, you can view the case created from the HubSpot contact or company.
KYC check in contact with the automatic KYC setting turned on
A KYC check is initiated automatically when the setting for automatic KYC checks is turned on. When a new contact or company is created, a KYC check will be created as well.
Existing cases from before the automatic KYC setting was turned on, will not automatically get a KYC check. If you would like to create a KYC check in those contacts or clients, you can initiate it manually by selecting the Create case button manually.